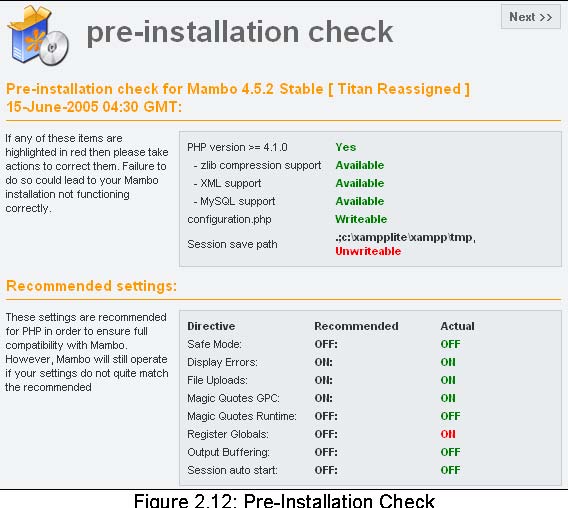
From now on, everything is going to go lightning fast because the Mambo web installer
will be taking over command. Go to the URL http://localhost/mambo/ where the web installer announces itself with a pre-installation check. This
check determines whether your environment is suitable for installing
Mambo. If there are many green test results, then it is already a good
sign. Depending on your configuration there can be differences here.
The web installer takes the configuration settings of Apache, PHP, and the operating
system into consideration. On Linux-based systems, attention should
be given to writing rights. If you are working with the xampplite solution
under Windows, the web installer should look as shown in the following
figure:
Click on Next to get the announcement of the GNU/GPL license, which you must accept by marking
the I Accept the GPL License field. The installation with the web installer takes place in the following
four steps:
Step 1
Database parameters are queried in a questionnaire. You can set up as many databases
as required in xampplite server environment. As there is a MySQL user
set up with the name root without a password, enter the name of a database that doesn't exist yet in the
installer. Users usually have the rights to access databases in a working
environment. Enter the following parameters in a local xampplite installation:
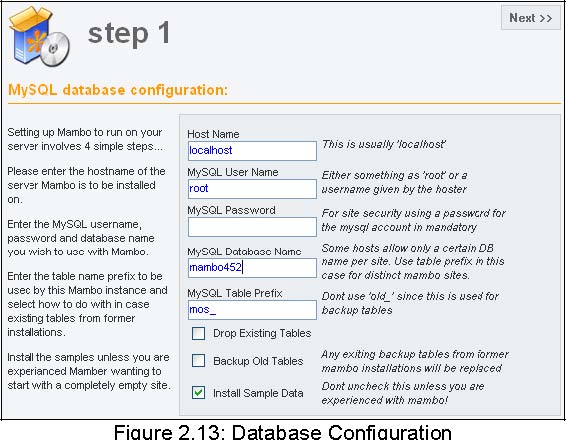
Host Name: localhost
MySQL User Name: root
MySQL Password: (leave this empty�but be aware of the security risk!)
MySQL Database Name: mambo452
MySQL Table Prefix: The web installer writes the text that is entered in the field before producing
each table. By default, the web installer suggests mos _, because sometimes you get only one MySQL database from an Internet provider.
If two Mambo pages are required to be operated, there would be a problem, since
you cannot differentiate one table from the other. By means of Table Name Prefix, it is possible to keep apart the tables of different Mambo installations (mambosmith_ or mambojones_). At this time you should accept the default mos_.
Drop Existing Tables: If you are dealing with a 'new' installation into an empty database, do not
check this check box. If there is an old version of Mambo in your database,
you can overwrite the old files by checking this check box.
Backup Old Tables: With Mambo, data security (backups) can be set up. The backups are stored in
special backup tables. To replace old backup tables, check this check
box.
Install Sample Data: By default, this check box is checked. This fills your homepage with sample
data so that you get a conception of its appearance down the road. Fill
your installation with these sample data; we will work with them later
on in the book.
Click on the Next button. After a security question, asking whether the installation should indeed
go ahead, the web installer creates the database and the appropriate
tables.
Step 2
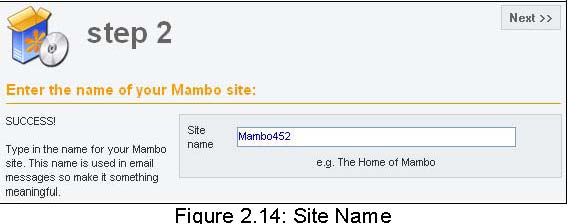
In step 2, you secure the name of your website. This name shows up in the header
of the browser window when someone accesses your website. This name
is also used in other places, for example, with confirmation e-mails
to registered users. Select a meaningful name. For our example page,
we have chosen the name mambo452. Click on Next to set the name.
Step 3

In step 3 you must confirm a few basic settings. These settings are important
as they permit the Mambo system navigation on your server.
URL: This is the URL of your homepage.
Path: This is the file path on your server that leads to your homepage. In our case
it is in the Windows environment.
Your E-Mail: Enter your e-mail address. As a Super Administrator you will receive e-mail
from your homepage.
Admin password: Mambo suggests a password. You can accept it or create a similarly complicated
password. A simple one would be sufficient for a local installation.
Accept the default options in the File Permissions and Directory Permissions dialog. During installation, Mambo automatically sets access rights to those
parts of the system where files are uploaded or programs are installed.
Step 4
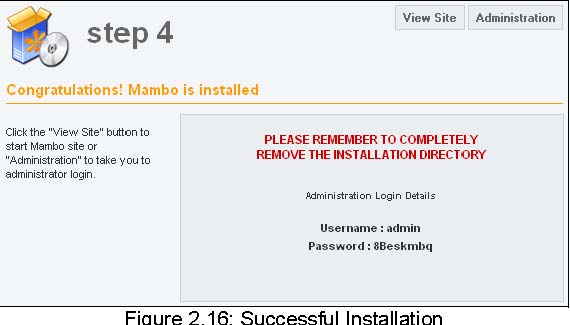
The fourth and final step congratulates you on a successful installation.
There is a notice in bold, red text that prompts you to delete the installation directory. Take good heed of this notice, because your Mambo website will not
run if you don't delete the directory.
In addition, your Administration Login Details are indicated. Note down the username and password.
Mambo assigns a new password when you go backwards from step 4, for instance,
if you want to change your settings or if the installation wasn't quite
successful. If you have forgotten or mislaid the administrator password,
there is a solution in the Appendix.
The installation is now complete. You have a choice between View Site (to start your homepage) and Administration (administration interface). To take a look at your newly created homepage, click
on View Site. If you haven't deleted the installation directory as of yet, you will get a friendly reminder to delete it and to check
out your page after you've done that.
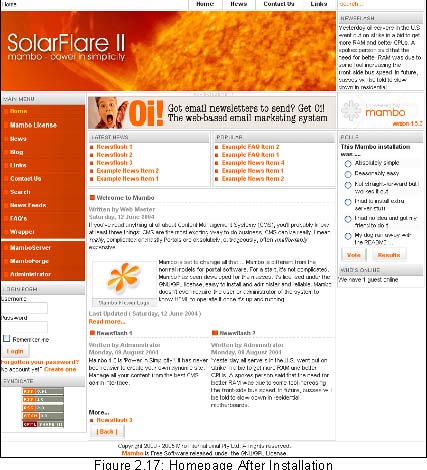
The result is very impressive. Look it over at your own pace, click on a few
options, and try to orient yourself. Lot of Mambo's functionalities
are used on this homepage, which is loaded with example data. We will
take a good look at these.Page number and header should be as it appears
in the book.

